 If possible I try to find a matching design and as poppies will be appliqued on it, this line drawing of poppies is a perfect quilting design. The process is going slowly, as it is no pleasure to have such a big quilt on your lap, but I am so glad that I am not struggling to push this quilt through the harp of a domestic machine. It is my first real quilt on which I am using my HQ16.
Monday, June 28, 2010
c&g quilt
In spite of the temperature of the last couple of days ( above 80 degrees F) I have been busy quilting this 60"x60" big quilt. The picture from the back shows you a detail:
 If possible I try to find a matching design and as poppies will be appliqued on it, this line drawing of poppies is a perfect quilting design. The process is going slowly, as it is no pleasure to have such a big quilt on your lap, but I am so glad that I am not struggling to push this quilt through the harp of a domestic machine. It is my first real quilt on which I am using my HQ16.
If possible I try to find a matching design and as poppies will be appliqued on it, this line drawing of poppies is a perfect quilting design. The process is going slowly, as it is no pleasure to have such a big quilt on your lap, but I am so glad that I am not struggling to push this quilt through the harp of a domestic machine. It is my first real quilt on which I am using my HQ16.Thursday, June 24, 2010
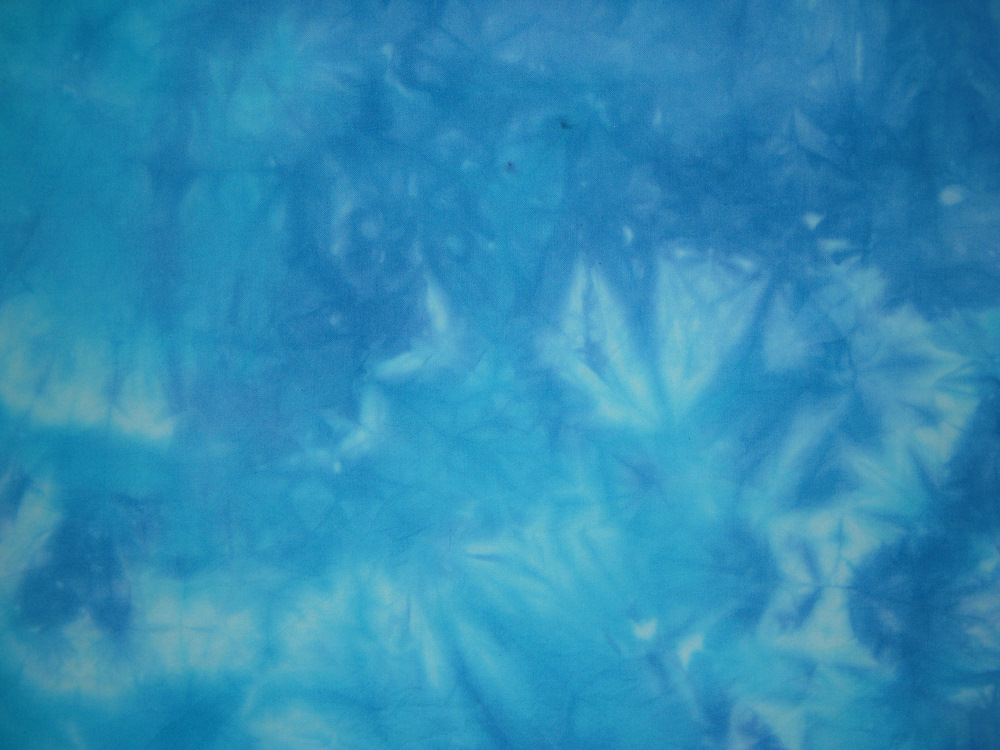
ice cube dyeing
About 2 months ago there was a discussion on the DyersList on how long procion dyes could be kept frozen. According to a number of members the strenght of the color would disappear very quickly. Well I can say that I have proof that they are wrong. This picture shows the fabric I dyed using frozen dyeconcentrate which was one day old:
 I emptied different blue dye concentrate - one was turquoise, I think the other one was mixing blue but I am not 100 certain on that - into an ice cube container. Put it into the freezer till the next day. Soda soaked fabric was crunched into a container and the ice cubes were placed on the fabric where they melted. I did not use all the ice cubes and put the remaining ones back into the freezer. This was done on February 24.
This week I used up the ice cubes and this is the fabric which I dyed with them:
Monday, June 21, 2010
ATC's
Last couple of days I have been working on some ATC's. I like to have a couple of them at hand because you never know when you might need them :-). Last week I traded an ATC with Hannie and also I signed up with ATC's for all. In other words reasons enough to make a couple of new ones. Here are 6 of them:
 With the ATC-group I signed up for 3 swaps so I will be making more ATC's the coming weeks.
For these ATC's I used cardstock, wall paper samples, paint, ink and some felt.
 With the ATC-group I signed up for 3 swaps so I will be making more ATC's the coming weeks.
For these ATC's I used cardstock, wall paper samples, paint, ink and some felt.
Monday, June 14, 2010
journals
I found some other material to play with: plain brown paper bags. The type of paper bags you can find at Target, Trader Joe and all those other shops. Strangely enough the brown wrapping paper we have in the Netherlands is much thinner. I don't know how well this paper would work if you want to make journal covers. Anyway I used one of Target's brown paper bags, crunched the fabric several times to get lots of wrinkles in it and applied diluted acrylic paint with a foam brush. Let this dry. Next step was to go over the paper with an oil pastel stick. Any type of oil pastel can be used. I think I used a plain Crayola. This is the effect it gave:
 I rfeally like the effect I got and decided to use them for making journals. And this is how they look now:
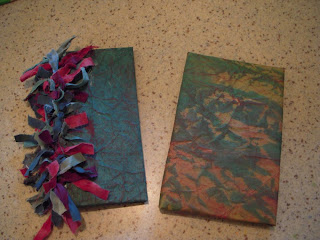 By the way, if you are interested, both journals are for sale. I have not yet had the time, but I really should work on getting my Etsy shop active.

 I rfeally like the effect I got and decided to use them for making journals. And this is how they look now:
 By the way, if you are interested, both journals are for sale. I have not yet had the time, but I really should work on getting my Etsy shop active.
ice cube dyeing
Quite often you end up with little quantities of dye mixture. Of course you can throw this away, but you can also pour this into ice cube trays. The fun part is that when the dye mixture is in the tray you cannot see anymore which color it was. Serendepity! Next day I soda soaked 2 fq's of fabric and crunched these into a container. On this fabric I emptied an ice cube tray which held different colors of dye mixture and let it melt. When the ice cubes were melting I could slowly see some of the colors, but in total the fabric still looked very dark. After rinsing and washing this is how it looks:

There are different opinions on how long you can keep the dye mixture frozen, but this fabric was down with 1-day old ice cubes. In my freezer are some ice cubes which are by now several months old. One of the coming days I intend to use these and see how much color they still have.
There are different opinions on how long you can keep the dye mixture frozen, but this fabric was down with 1-day old ice cubes. In my freezer are some ice cubes which are by now several months old. One of the coming days I intend to use these and see how much color they still have.
break down printing part 2


Slowly all my stuff is getting into it's usual place :-). This means that I can show you the result of the break down printing. After the screens have dried enough, I removed all the items which gave an impression. This is rather difficult, because I did not want to damage the layer of dried paint/printpaste mixture. Unfortunately some areas gave way too much.
Next step is to place the screen upside down on -line dried - soda soaked fabric. Apply some clear print paste mixture on the screen and with a squegee (sp?) pulled several times the print paste mixture. The first pulls actually don't show any result, but after some 4-5 pulls the dye mixture slowly let go of the screen. In total I managed to create 4 fq's. At this time there still was dye mixture on the screen but pulling more would have given almost solid fabric.
Almost forgot to mention this, but I used 2 different colors of procion. A red and a purple. I admit the difference is difficult to see. Next time I'll make certain that there is more difference in the colors,

Sunday, June 13, 2010
Breakdown printing

Friday, June 04, 2010
pounded fabric
A technique which I have not done for a long time is pounded fabric. Again one of the techniques which is done with acrylic paints. Not really time consuming, but you have to wait a couple of days before you can see the result. But as you can see on this picture it gives an awesome result:

To create this effect, you need a wet piece of fabric, a plastic garbage bag, acrylic paint and a brush. You pounce the diluted acrylic paint with the brush onto the fabric. I prefer to place the wet fabric into the garbage bag before I do this, so that I do not have to lift the wet fabric into the bag. That is be a bit messy to do :-). On this fabric I used blue and green acrylic paint. No particular brand as any brand will do. For this I used the $0,50 cent bottles from JoAnn.

After this the fabric bag was partly closed and left into a warm place for 3-4 days. Because of the way that the fabric is crunched the diluted paint creeps up a bit and you get this kind of effect:

To create this effect, you need a wet piece of fabric, a plastic garbage bag, acrylic paint and a brush. You pounce the diluted acrylic paint with the brush onto the fabric. I prefer to place the wet fabric into the garbage bag before I do this, so that I do not have to lift the wet fabric into the bag. That is be a bit messy to do :-). On this fabric I used blue and green acrylic paint. No particular brand as any brand will do. For this I used the $0,50 cent bottles from JoAnn.
After this the fabric bag was partly closed and left into a warm place for 3-4 days. Because of the way that the fabric is crunched the diluted paint creeps up a bit and you get this kind of effect:

splattering
A fun technique to do on a sunny day. I once did it indoors - years ago - and I still have paintspots on my floor :-(. For this technique you only need fabric, acrylic paints, water and a brush. Fabric was pinned on foam sheets, sprayed with water and diluted acrylic paint was splattered on it. Some more water was added and the foam sheets were put into a vertical position. This way the paint drizzled down and the white fabric got some color as background. After the fabric had dried I again splattered paint on it, but this time I wanted the 'splatters' to remain as they were so I did not spray any water on it and let the fabric dry horizontally.
 It looks a bit like the paintings of Jackson Pollock For the moment this fabric will go into my stash. I have no immediate use for it, but one day I will.
 It looks a bit like the paintings of Jackson Pollock For the moment this fabric will go into my stash. I have no immediate use for it, but one day I will.
art cloth
As I mentioned in an earlier post, the art cloth needed more. Using paintstiks is a really slow procedure on such a big piece of fabric - 5 yards - so I decided to do stamping. I wanted to use matching stamps with the spirals so I opted for using a yoghurt container. With a foam brush I applied Lumiere paint on it - in different red/silver/blue colors and stamped circles in a random order. See picture:
 Better, but not yet complete. Although I prefer using handmade stamps, there is also a commercial stamp with ovals with I really love. I stamped - again randomly - using a green Lumiere:
 This was the last addition to the artcloth. I really like the way it turned out. It would be a waste to cut up a piece of fabric like this, so I intend to use it to make a duvet cover out of it.
Subscribe to:
Posts (Atom)