Friday, March 29, 2013

Holes in the sky

There are holes in the sky
Where the rain gets in
But there ever so small
That's why the rain is thin
 
This poem is written by Spike Milligan. For Sky is the Limit the March theme was poem. And while doing my research I discovered that poems are not my thing. In other words I got completely stuck on this one till Irene mentioned Spike. After some googling I found this funny little poem and it inspired me to make this quilt.


First I made the quilt, background, tree and cloud (batting covered with cheese cloth). The next step was to punch holes through it. I never did something like this and I admit it is fun to do:-). The holes are protected by some medium. After all I don't want them to go fraying. Size is 12"x12". I am linking this post to Nina-Marie's Off the Wall Friday.

Sunday, March 24, 2013

At the pond

And here is the finished result. On Friday I showed you how I made the background of this quilt. The next step was to add all kind of applique to it. I made this quilt for an online class with Katie PM and as I am using trees as my theme for the Voyage quilts, I decided to use trees for this one as well. Because this was a class piece as well, I had to follow certain rules, for instance all colors of the 3 (12 steps) colorwheels had to be used on top of the background. That are a lot of colors! I like the idea of combining colors in a tree, but in this case the pine trees in the back don't show up that well because of all those colors. They would have been stronger if less colors were used. Another thing I see now the quilt is finished is that the pond could have been smaller. For the blossoms I used small snippets of fabric. One way of attaching this to the background is by covering it with tulle and stitch this. The disadvantage of tulle is that it - slightly - changes the color. Instead of that I decided to add a seed bead to every snippet. In general I am happy with the result. And as it is for Voyage, size of this quilt is 12"x17" and the title is 'At the pond'.

Friday, March 22, 2013

new quilt

I have started a new quilt for Voyage.  Not much to see (yet), but I want to show you how I build a quilt. My starting point is a piece of fabric which I don't like but which is excellent for a backing. Besides the color wheels of last week I had also dyed 6 neutrals which I want to use for the background. With my roller cutter I cut out wavy strips. These strips I glued to the backing.
 I know that there are special glue sticks for fabric, but to be honest I just use a regular one. When all strips are in place I made a sandwich of it and started quilting it.
Unfortunately the picture I took of this did not turn out very well, so you just have to believe me :-) My next blog post will show the progress of this quilt.
I am linking this to Nina-Marie Off the Wall Friday.
Thursday, March 21, 2013

Selected!

Remember this quilt? I entered it for an exhibition in Zumbrota MN USA and today I heard that it has been selected. This means that it will be printed on aa 44"x24" banner and will hang in Zumbrota from May to September 2013. At the end of summer the quilt will be sold. Besides that a special website will be developed to display the 28 chosen works of art.

Wednesday, March 20, 2013

frozen paint

This time not fiber related :-), but such fun to do. On Mickey Bond's blog I found this technique and as we had a couple of cold nights last week I decided to give it a try. On the first picture you see the small canvases (4"x4") with globs of Golden Fluid Acrylic and Golden Medium where I placed them outside.
Temperatures during the nights were around 25 degrees F. I left the canvases there for 3 days. And look how they turned out:


I love the way they crackled. To keep everything together I applied several layers of medium to them. The coming nights are - again - expected to be cold and I still have a couple of these canvases so I intend to do it again. This time adding some cheesecloth to it as well.

Monday, March 18, 2013

colorful weekend

My weekend was filled with dye powder, soda ash and syringes as I created these 3 18-steps color wheels. One is in light, one is in medium and one is in dark values. I used Tangerine, Mixing Red and Mixing  Blue. Okay, I admit it has been some time ago since I dyed regular color wheels but with these 3 I should be okay for a very long time :-).

Friday, March 15, 2013

qr code quilted plus give away winner

Much progress has been made on the QR quilt. To be certain that my design is at the end the same size as at the beginning of my quilting, I transfer it to Golden Quilting Paper. This takes some time, but I think it is worth it. The only downside is that you have to remove all the tiny paper bits afterwards. Most of my creative hours the last week were spend on this quilt and I still have to remove lots of paper.
Last week I participated in the blog hop and now it is time to announce the winner. Using Random.org the winner is number 6, which is Lisa from Something about Nothing. Lisa I tried to email you, but that failed, please contact me at wil_opio_oguta at yahoo dot com.
And as it is Friday, I am linking this blogpost to Nina-Marie Off the Wall Friday.

Monday, March 11, 2013

Combining 2 techniques

When I read this blog post, I got the idea of combining kanoko (tied) shibori with ice cube dying. Ice cubes because snow is not there and ice cubes are available in the store :-). Luckily I have a big supply of buttons and after some time my fq looked like this:

 I soaked the fabric and placed it in a glass vase, sprinkled dye powder over it (avocado, alpine blue and black), topped it up with ice cubes till it was like this:
 And left it till the next day. After rinsing, washing and drying this is how it turned out:
I love it! More fabric will be dyed like this, that is for certain.

Friday, March 08, 2013

QR continued plus give away


This quilt is taking up lots of my time, but this is what I did last week. I had enlarged my paper design to the size I needed - about 34"x34" - marked the squares which I had to cut away and was ready to start the cutting. This was scary to do because if I made mistakes I would not end up with a QR code, but with a Swiss cheese :-). Luckily I can say, that I only made 2 slight errors in marking, but I can cover them up with the quilting. After many hours of cutting the batik fabric away, this is how the top looks now. And yes, my phone can read the QR code!!
I am linking this post to Nina-Marie's Off the Wall Friday, but also to the Quilter's Blog Hop Party. For this I am giving away this snow dyed fat quarter:

If you want to enter this give away, please leave a comment on this blog post. You have till Friday March 15 noon Amsterdam time to do this. After that I will pick at random a winner. It is likely that you do not live in the Netherlands, but international shipping is no problem. Be sure that you check out this party as there are many more give aways.

Monday, March 04, 2013

testing with squares

To find out why the qr code did not read I did some testing to eliminate possible courses. Are the pins the reason?
 Or is there not enough color difference?
No to both of them. In both cases my phone can read the qr code. That leaves me only one conclusion and that is that the squares really have to connect. My fuzzy cutting has to be the problem. Technically speaking I could piece the whole top, but this is not really something I like to do. All those points which have to match :-(. So I am going to use a different technique which I call raw edge mola. Don't know whether this is an existing name, but I like it. I have enlarged the qr code to the size I want - 33"x33" - and will pin this on top of my batik. The next step will be to cut out all the black squares. Afterwards the batik will be placed on top of a black fabric. This should work, I hope. Any one interested in approximately 550 black squares??

Sunday, March 03, 2013

squares continued

I cut the remaining squares and was able to complete the whole design. This is what it turned out into:

There is only one major problem, the qr code cannot be read. And at the moment I do not know why this is. My first pinning showed some gaps in between the squares, so I repinned it. The picture is taken after the second pinning. Are the pins the problem? Are there still to many gaps? Not enough contrast between the background and the squares? Not square enough? Right now, I have no clue what the reason is. If you have any idea why this is, I would love to hear it.
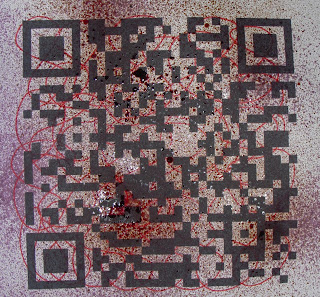
This is the qr code I made using this site: http://createqrcode.appspot.com/. I wanted to know whether I could add color to it, that is the reason that the red lines are drawn over it.
And something else. I am participating in Beat the Winter Blues blog-hop party - see this link:  http://quiltinggallery.com/quilters-fun/quilters-blog-hop-party/. Coming Friday I will post what my give away will be.
Blog Hop Party with Give-Aways

Friday, March 01, 2013

tiny squares

Progress on this new quilt is slow. Last week I fuzzy cut hundreds of these tiny squares - each 1"x1"- and started pinning them to the background to discover that I had not enough of them. My Bondaweb roll was finished so I had to get a new supply. Unfortunately I did not know the exact name for it and ended up buying the wrong type online. I discovered that when it arrived so there was no other option than to plan a trip into town this week. I now have a new supply of what is called here Vliezofix and yesterday I spend most of the time cutting more of those tiny squares. My plan for this weekend is to pin these to the background and take a picture to see whether it is what I want. If so I can fuse them and make a sandwich out of this top. Till then you have to settle for this detail picture :-).
I am linking this to Nina-Marie's Off the Wall Friday.