Friday, December 26, 2014

Painted face

A couple of years ago I painted this fabric. As I had no use for it at the moment it ended up in my stash. This month the theme for Sky-is-the-Limit is painted face and I knew that I had the perfect fabric for this :-). The outlines of the face are stitched on it.


Wednesday, December 24, 2014

Saturday, December 13, 2014

ice cubes

There are different ways of using ice cubes in dyeing. In this case I made dye concentate and froze this into ice cubes containers. I have special ones for dyeing purposes.


In a big container I placed a soda soaked piece of fabric and placed a number of ice cubes on top of it. I used a yellow one and two different blues.


Covered everything with a second piece of fabric and left it there till the ice cubes were melted.


After rinsing and washing these are the fabrics:


The top one was the fabric which was on top. I can see that because there are more white or very lightly colored areas.

Wednesday, December 10, 2014

Wednesday, December 03, 2014

Saturday, November 29, 2014

ice dyeing and salt

First of all I want you to know that I am not a scientist, but when I heard that salt reduces the melting time of ice, I knew that I wanted to test this with ice dyeing. For this experiment I used 2 fat quarters, ice cubes, a mixed red Procion and plastic plant containers. Each fq was presoaked with soda ash and crunched into a container with ice cubes on top. I used about 3 tea spoons of dye powder on each and on the left container 3 tea spoons of salt. To be certain that there would be no pooling of melted ice I placed everything into my kitchen sink.


After 3 hours I could not see much difference in how much ice had melted:


After rinsing and ironing I put both pieces of fabric onto my desig wall. The salted one is on the right:


I cannot say that the salt reduced the melting time of the ice. The pattern of the salted piece shows more white and has sharper lines, but is this the effect of the ice or just coincidence? I cannot say for certain. Guess that more experimenting has to be done.

Wednesday, November 26, 2014

Wednesday, November 19, 2014

Tuesday, November 18, 2014

Another painting technique

If you read my blog on a regular base, you know that I prefer working with my own hand dyed fabric. This time however I decided to work with a multicolored batik. To change the look I decided to apply paint to it. This is how I did it. First I started with stitching lots of folds. The folds were - on purpose - irregular in width and not at all neatly lined up :-). The stitching is time consuming, but it gives neat sharp lines after the painting.


After the stitching my fabric looked like this, top:


and back:


Cover your work space with plastic or old newspaper because now is the time to add the paint. I used Lumiere halo gold blue, one of my favorites, and a foam brush.


Apply the paint till the whole top is covered.


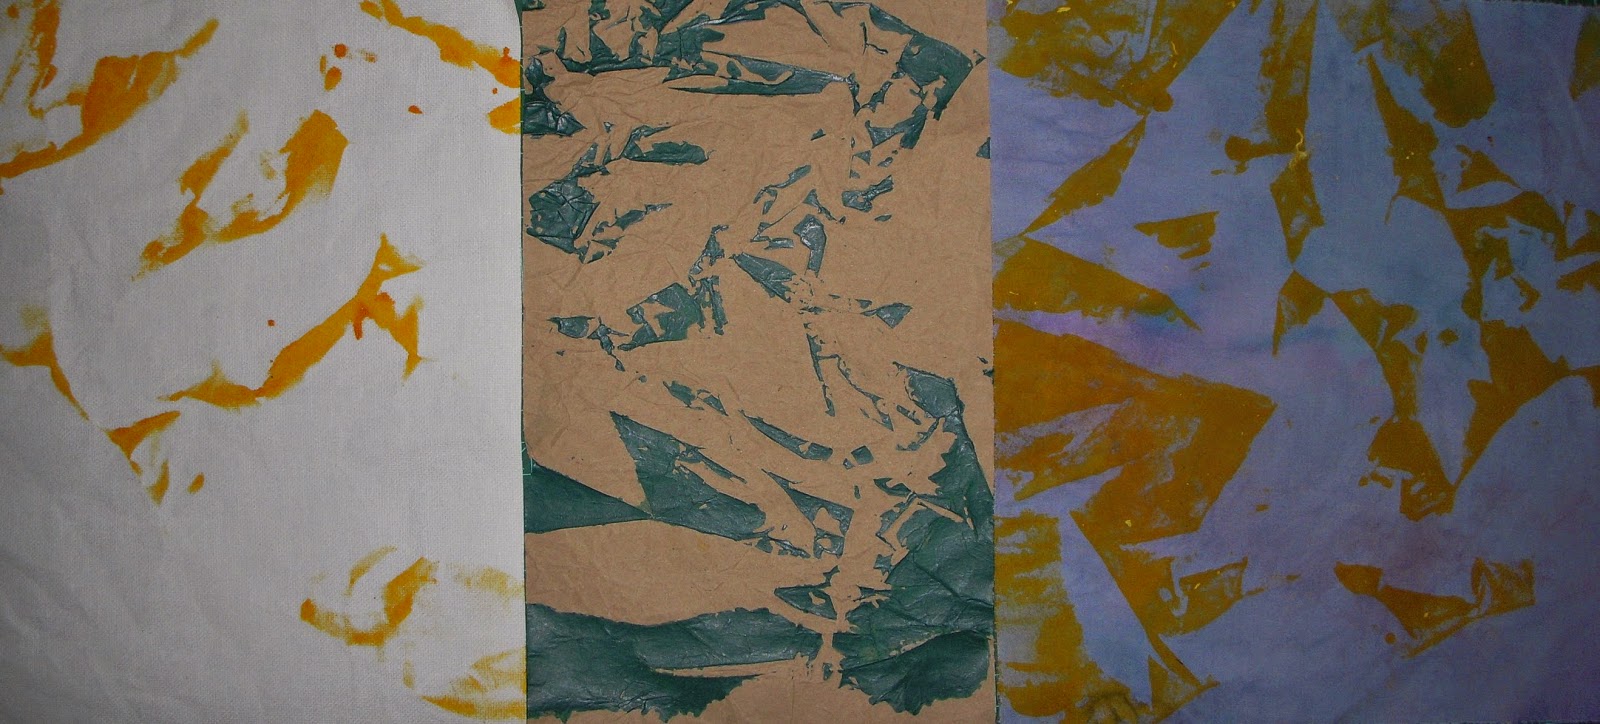
Let the paint dry. Next step is to remove the stitched lines. Iron the fabric from the back and this is the result:


As you see the lines are outlined sharp and irregular. 

Sunday, November 16, 2014

layered painting

For this technique you need different types of paint, foam brushes and a surface to paint on. I worked with textile paints (opaque and transparent) and acrylics. The surfaces I used were fabric, brown wrapping paper and canvas. The fabric I used was a hand dyed one, which looked dull and definately needed more.


I prepared my working space by covering it with old newspapers, but plastic will work just as well. Crunch your fabric or paper and iron it flat. 


The colors will overlap. Keep this in mind when you pick your first color. If you start with a yellow transparent and use a blue one for the next session, you will have green. Pick a color of paint and a foam brush and dabb the paint so that it looks like this:


No need to be precise when you dabb the paint. Let it dry and iron your pieces. They will look like this:


Not yet very interesting, but that will change because we are going to repeat this process several times. Apply as many layers of paint as you want till you have an interesting looking result. This is how my samples looked at the end:


It was the first time that I used canvas for this technique and I discovered that the thickness of the material made it difficult to use. Even after ironing it did not want to stay flat but remained like this:


I applied the paint as best as I could, but for the next sessions I folded straight lines and ironed these. That worked much better.


Wednesday, November 12, 2014

Friday, November 07, 2014

Townscape

Being late is not something I like, but this time it happened. The October theme for Sky-is-the-Limit was townscape and this is what I created for it:


Only the doors and the windows are my own hand dyed fabrics, the other ones are commercial fabrics. As it is Friday I am linking this post to Nina-Marie's Off the Wall Friday.

Wednesday, November 05, 2014

Wednesday, October 29, 2014

Friday, October 24, 2014

Galleribba

If you are looking for small affordable art, check out Galleribba. On this site you will find a range of international artist who show their small art which is for sale. Some of my work is there as well. This link to ISSUU gives a good idea what is available. And as no blogpost is complete without a picture, here is one of my small collages which you can see on the site as well:


Wednesday, October 22, 2014

Sunday, October 19, 2014

No ugly fabric

When you are a dyer, there are no ugly fabrics. You might have fabric which needs something more. I had a couple of those pieces and I decided that it was time to work on them. Unfortunately I cannot show you how they looked before, but this is how they are now:


The top one was a folded and clammed shibori with too much white. I overdyed this with orange and red. The second one was a snowdyed fabric which had been in the pooled dye for too long so not much pattern was shown on the fabric. I overedyed this with red as well.

Wednesday, October 15, 2014

Friday, October 10, 2014

dyeing

I use a lot of green fabric in my work and my stash was getting low. Time to schedule a dyeing day. Besides a gradation and some parfait I also dyed these 2 fabrics:


This was done while the fabric was folding lenghtwise and then a cotton thread was tied around it. The pattern is very subtle.


And for this one I tied kumihimo bobbins and buttons in the fabric before I poored the dye powder over it and topped it with ice cubes. I took this picture during the melting:

For both pieces of fabric I used deep navy and golden yellow. And as it is Friday I am linking this post to Nina-Marie's Off the Wall Friday.

Wednesday, October 08, 2014

Saturday, October 04, 2014

SAQA auction

In the 3rd section of the SAQA auction my bid on this beauty was accepted:


It is a black monoprint on white fabric with additional chromacoal coloring and free motion quilting.

Wednesday, October 01, 2014

Tuesday, September 30, 2014

SAQA auction

The 2nd part of the annual SAQA auction ended last weekend and my bid on this beauty was accepted:


It is the 2nd quilt I have which is made by Tiziana Tateo, an Italian fiber artist. The quilt I made for this auction is sold as well.

Wednesday, September 24, 2014

Tuesday, September 23, 2014

Collage is completed

And here is the completed collage:


I added a bunch of beads and a painted dragonfly to it. Gel medium was used to keep the beads where I wanted them. To make certain that nothing can get damaged, I covered the whole canvas board with resin.

Sunday, September 21, 2014

SAQA auction

It is September or in other words time for the SAQA Benefit Auction. It started last week and I was able to buy this beauty:


Just love the effect Diane got with her simple shapes. Coming Tuesday starts the second part of this auction and my quilt is in there. Check out this link to see what else is available. Bidding starts on the 22nd and ends on the 28th.

Friday, September 19, 2014

Collage

This is what I am working on at the moment:


A painted canvasboard with fabric and paper on it. It needs a bit more, but I am not certain at the moment what that is. Maybe some beads? Will do some sampling later today. Size is 9"x12".
I am linking this post to Nina-Marie's Off the Wall Friday. Check out the link to see what other artists have done this week.

Wednesday, September 17, 2014

Friday, September 12, 2014

old work

As I wrote in this post I had cut up an old class sample and attached it to a canvas. Not certain at that time whether it was now complete or not, I kept it in my studio and had a look at it now and then
.

I sampled both washers and beads, but neither option appealed to me. Luckily I had not yet thrown away the remnants of the block and I decided to free the plastic strips of it. These I glued to the canvas, covered everything with a layer of gel medium and let it dry. This time I am satisfied and I can say that it is finished :-).
As it is Friday I am linking this post to Nina-Marie's Off the Wall Friday.

Wednesday, September 10, 2014

Friday, September 05, 2014

coffee table book

A lot of the quilts I make are 12"x12" and by now I have more than I have wall space to hang them. An option is to put everything in a cupboard but that way nobody will see them. I decided to make a kind of coffee table book using a binder and acrylic. The binder was shortened and with a hole puncher holes were punched in the remaining part of the binder and the acrylic. An office thingie - sorry no idea how this thing is called - connects the parts and a glue downed ribbon covers this. This is how it looks:        


I hand stitched o-rings to the back of the quilts so that the quilts can easily be put into the book - or taken out again.


The book can stand or be placed flat on a table. I will probably rotate the top quilt now and then :-).
I am linking this post to Nina-Marie's Off the Wall Friday.

Wednesday, September 03, 2014

Monday, September 01, 2014

Blue moon is finished

At last Blue moon is finished. If I had only been working on this quilt, it would not have taken so long, but most of the time I am working on 3-5 quilts at the same time. This one started as a sunprint using acrylic paint in June. The moon needed some extra paintwork and finally the quilting. Here is the picture of the whole quilt, size 12"x24":


And here is a detail picture: