Saturday, February 28, 2009

And one more still life

I decided to give the still life I am working on for the 3rd lesson a break and started this afternoon working on the next lesson. For this one I want to incorporate what I learned during this class. One of these things is not to use one piece of fabric but cut it into different pieces and put these next and over each other. With this little 'trick' fabric becomes much more interesting. This picture shows you my first lay-out:

I am not yet happy with it. Background is made from black/white fabrics, bottles from zapped organza and the plant plus container is made from batiks. Right now the size is about 20"x20" and I think it is a bit cramped. Probably I will enlarge it. And hopefully by that time I also know what to add as an eye catcher, cause I think that that is missing at the moment. Any suggestions are appreciated :-)

Wednesday, February 25, 2009

atc swap

I participated in the Cyber Fyber exhibition organised by Susan Lenz. With this exhibition there was also the option to enter atc's for an international swap. Your guess is correct, I entered 3 of my atc's. This is what I received in exchange:

The act on the left is made by Susan Lenz, the one in the middle by Suzan Widecrantz and the one at the right by Elizabeth Price. All so different and all so very pretty. Thanks ladies for participating in this swap!

Tuesday, February 24, 2009

One more still life

Another week, another lesson with Pamela. This time the focus of the still life has to be on texture. I decided to go for flowers. All the flowers you see on this picture are made in different ways. Both the vase as part of the background is folded fabric. On this picture you see my first attempt. The stems of the flower are all the same length - I have changed that now - and the setting is missing something. In other words it is simply dull. So consider this picture a work in progress :-). I have added some more fabric to the bottom and to the left to enlarge it. This way there is space to add more items and at the same time the vase with flowers is not so much in the centre of it. It is not yet ready to have a picture taken. At the moment it is placed on my tables and not all the items are attached to it. Tomorrow I will continue working on it and hopefully have a fresh picture on my blog later that day.

Sunday, February 22, 2009

Alphabet and Kiva

Through an email from Synnove - a fellow student with Pamela Allen's online class - I became aware of Kiva. Normally I would not post about this, but I believe in micro-finance and that is what Kiva does. By lending us$ 25 you will be able to help somebody and because it is a loan, you get your money back. So if you want to join, please do. If you don't know yet, I will put the banner on my blog so you can always find the organisation at a later day :-).

And as the main focus of my blog is about creativity I am posting today my 2-weekly picture of a character of the alphabet. Today it is time for the D of discharge. From freezer paper I cut out the shape of the D and ironed it to the fabric. With a brush I applied discharge paste. Removed the freezer paper and ironed it. I had the discharge paste for a long time before I used it and now I am a great fan of it. It is much more controlable than bleach. Only be certain that you do this in a well-ventilated area as the fumes are not healthy. My ironing board is in front of a window so I opened that when I was ironing it.

Wednesday, February 18, 2009

phone

I was quiet for a couple of days as I had not much to show. Some bindings needed to be handstitched and other stuff like that which is not worth showing. However today I could find some time to make something new. I had treated myself to a new cell phone. My previous one had a cord attached so I could wear it around my neck (most of my clothes don't have pockets) but this one did not. Of course I could put my new phone in my bra, but I decided to make a small purse for it. The fabric I used for this is made by my friend Kelly. I quilted it with spirals, stitched it together. Satinstitch was used for the edges and a small piece of velcro is added so that the flap can be closed. Size is 4"x4,5" (9,5x11 cm).

Sunday, February 15, 2009

work in progress

I have been busy quilting my still life. Here are some pictures of it. I am posting both pictures from the front as well as from the back, where you can see the stitching lines much better.


Quilting is done, binding is halfway, same goes for sleeve, label is attached. Next step is to add some more embellishments, but that is for later this week.

Saturday, February 14, 2009

journal quilt

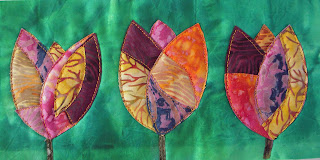
For the CQGB I made this journal quilt for February. It is based on an excercise given in one of Pamela's lessons. Size of this quiltlet is 6"x12" (15x30 cm). Background fabric is a sunprint. The tulips are made from different batiks.
Purely coincidental this month's quiltlet is also showing tulips, just like the one I made for January. I might be challenging myself to stick to tulips for all 12 months.

Thursday, February 12, 2009

another still life

This week the assignment for Pamela's class is to make a still life with muted (grayed down) fabrics patterned in a stripey or linear way. Luckily my stash is rather large so I selected all the suitable fabrics and started working on the background.

For the background I used 3 different batiks. Not one piece, but several pieces of the same color are used to. I had written down several ideas to work with and settled on an impression of a room. Focal point is the chair which is based on the peel design chair. With a chair you need a table and some light, don't you? These were added and some other extra stuff. The blue spot you see on the chair is a book. At the moment it is only made from 2 layers of fabric, but I will add some hand made paper or real paper pages before this quilt is finished. This is how it looks now:

It needs a bit of tweaking which I did after this picture was taken. Next step is machine quilting it. Size is approximately 16"x24"(40x60 cm). Title of the quilt is 'Reading'.

Wednesday, February 11, 2009

ATC's


Normally I have a number of atc's ready to be swapped, but being a participant in Kate's atc birthday swap I send out rather a lot of atc's at the moment. That was the reason that the last couple of days I have been creating new ones. For this set I used wall paper and precut foamies. Several layers of Golden acrylic paint were put on them and a finishing touch with some paintstiks.

With this new supply I should have enough to get me through the next 2 months.

Sunday, February 08, 2009

painted journal quilt

With my surfacing group we now and than make a journal quilt based on a certain theme/principle. This month it is: painted journal quilt. I thought I would share with you how I have created mine. The first step is to get an idea what to create. I decided to make something in the art nouveau style. One of my source books is '4000 Flower and Plant Motifs' by Graham Leslie McCallum. In this book there is a selection of art nouveau pictures and this is the one I have chosen. I enlarged the picture and copied it to transparant quilting paper. This paper I placed on top of my fabric sandwich. I used orange and green thread and quilted following the lines. After quilting it looked like this:
Removing the paper and hiding the thread ends works great when watching telly :-). The following picture shows how it looked after doing this:
At this moment the journal quilt was ready for the paint brushes. With a brush size 2 I filled in the areas which needed coloring. I worked with Deka silkpaints, Pebeo setacolor and Lumiére textilepaint. Here is the result:
This journal quilt is almost finished. I only have to attach a binding. Because of the small size the piece does not need extra quilting in the background. The fabric I picked for the background is another piece of shaving cream dyed fabric.


Saturday, February 07, 2009

snow dyeing


As promised, here are the pictures of my other snow dyed pieces. In reality the colors are a bit paler than the pictures show but I have been told that when I nuke the fabric after the snow has melted the colors will be more intense. Never thought I would say this, but I am hoping for more snow the coming days :-).

For these 1/2 yard pieces I used mulberry and deep purple with some nickel. With 'normal' lwi you can predict the colors you will get, but I have found out that with snow dyeing this is much more a surprise.

Wednesday, February 04, 2009

still life and snow

I finished the quilting on my b/w still life. As the quilting is also done in black and white showing a picture of the front would not have been very helpful. Therefore I am showing you two pictures of the back so that you can see the quilting lines. I used a variety of designs.

I was told that the last couple of days it was not possible to click on the pictures to get a larger image. Hopefully that glitch has been solved.

Another thing I did today was some snow dyeing. When I woke up this morning I saw that there was snow, not much only 0,5" or so but enough to try out this technique. Dyeing friends of mine in the US have lots of opportunities to snow dye, but for me it was my first chance. This picture shows you my tray filled with fabric, snow and dye mixture. It took the snow 4 hours to melt and at the moment the fabric is soaking. I was able to gather more snow for a second piece. Pictures will follow later this week.

Sunday, February 01, 2009

Still life

About a year ago I took an online class with Pamela Allen (Think like an artist) and I loved it. So when I heard she would give another one I jumped in again. This one is called 'Still life is boring NOT'. for the first lesson we had to make a still life (not a big surprise vbg) using black and white only. Well I have a huge stash of b/w fabric as I love it. A lot of still lifes are with fruit, flowers, fish and so on, but I wanted to go into another direction. My choise was a more modern still life. This is the picture of my first lay-out:

Some things are okay but it was not complete. For an image of how a room looks after a party, it is way to neat. I am good at creating chaos in my studio, but this quilt needed it too. Pamela gave some suggestions and this is how it looks right now:

Much better. Some details still have to be changed and other ones will be added after the quilting, probably glued.